Showing posts with label DIY. Show all posts

Friday, February 15, 2013

heart-shaped happiness to buy & DIY

Okay. I know you have likely had it up to here with all of the hearts, roses, pink, red, glitter, lovey dovey, Valentine crap that the world has been throwing at you since Christmas. I get it. I can understand your frustration. 


BUT today is the day when everything heart-shaped or heart-printed goes on sale. C'mon. The day after Valentine's day is my favorite non-holiday! This day needs to be celebrated. And don't even get me started on the discounted chocolate... Oh, the chocolate.


Last year I posted a little round up of heart things I owned and admired from afar. This year I've swapped out my heart things for things you can make. Nothing like some fresh lovey-dovey DIY ideas to get your blood pumping in the morning, right? I really wanted to type eh? right there but decided to pay homage to my American readers (hi!) with the second-best word to get people to validate your thoughts.

Right! So, after a bit of Googling, Pinteresting & blog-hopping, here are my picks for the best heart-adorned things to BUY & MAKE. 


1. big & bold | black & gold tote | AlphabetBags, $21.96
2. sassy-pants quote | silicone/glass water bottle | bkr, $32
3. i need to stop thinking about buying this | silk scarf | BRIKA, $98
    use the code MAKEITHAPPEN before Monday & get 20% off!
4. comfy | gray heartbeat tee | BurgerAndFriends, $24 
5. even our toothbrushes are in love | mint green toothbrush holder | urbanoutfitters, $12

6. someone have a baby, so i can buy you this | printed swaddle blanket | JuniperWilde, $42
7. irresistible | black & gold enameled ring | f21, $5.80

I think I might have to cave and buy the ring. It's small, cheap and I've been obsessed with black & gold lately. It's probably meant to be.


1. unique take on a heart tote | hand-stamped tote bag | V and Co
2. a rainbow of little hearts | mini geo gift boxes | MiniEco
3. great alternative to open heart back shirts | lace sweatshirt | PearMama
4. cuddle up | stamped throw blanket | A Beautiful Mess
5. i have one of these in brass | wire ring | ISpyDIY

I found some other sweet round-ups while I was preparing this post. Check out Down & Out Chic for material goodies (the red pillow & gold mug are my favorites!) and DesignSponge or WhimseyBox for crafty/DIY inspiration overload.

Happy shopping/crafting! If you made something heart-y this year and want to share, feel free to link up in the comments.

xx Janelle

FYI - I was not compensated for including any of these products in this post. These companies don't even know me or my blog. Free promotion!

Tuesday, February 12, 2013

last-minute washi tape valentines (for the young at heart)


Do you guys know about washi tape? I started noticing some projects pop up on Pinterest last fall and being the craft supply hoarder that I am, I had to get my hands some ASAP. Washi tape, in case you are still in the dark like I was, is a thin, decorative masking tape that looks like this.


It works really well to tack up photos/art instead of framing and is great for gift wrapping too. All major creative supplies stores like Michael's, DeSerres sell it and many small, local craft shops too. It should come as no surprise that it originated in Japan - every cute fad was big in Japan 5 years before it ever became cool in North America. Proof? Hello Kitty, maxi skirts, Harajuku style, bows. Case in point. On to the Valentines!

Most of you probably stopped giving them out years ago, you know, like, when you started grade six. I did too actually, but I made some on a whim last year to mail to a few university friends who I missed. This year, I got the itch again. D's niece and nephew were also coming to visit so I wanted to be able to give them a little something for the holiday. Here they are:


These are super-easy to make. All you need is washi tape, cardstock & pens. 1. Trace around a business card to make your base. 2. Press down a strip (or two!) of tape. 3. Write a lovey message. 

That's seriously all there is to it! These probably took no more than 5-10 minutes to make. The hardest part is deciding what to write on them. Once you get into a rhythm, it's easy to make a bunch at once. I think they'd be great for kids to bring to school or you could give them to your neighbours. These ones will be going to my co-workers - shhh! Don't tell.

Do any of you still give out Valentines or make a special card for your loved one? Got any washi tape projects for me to check out? Let me know!

xx Janelle

PS - I took these photos at night, which explains the laughable white balance. Forgive me! It's winter and it gets dark before I even get home...

Sunday, December 23, 2012

4 Step DIY Glitter Garland - with no mess!


When I posted my Christmas decor sneak peek a few weeks ago, I had no idea what to do with the supplies. All I had was a colour scheme, paper, some ribbon and a strict budget. Inspired by the image of "c'est noel" posted on someone's front door, I decided to make a glitter garland with the same expression.

I grew up in a French town in New Brunswick and my father's parents are/were Francophone so we have always kept traditions, customs and carols from our French culture. Apparently, my French spelling skills need some practice though, because on my banner the two little dots are supposed to be over the E and not the O. Oops! This year, I decided that I would like to try to work this into our own (me & D's) celebrations and what better place to start, than with decorating? 

The trick to keeping this glitter craft mess-free is to use pre-made glitter paper, instead of gluing loose glitter to plain paper. I bought a large sheet of gold glittery gift wrap (made by the adorable Rifle Paper Co) from my favorite local stationery store Duly Noted. Rifle Paper Co doesn't seem to be carrying any in their online shop at the moment, but you can find some at Paper Source or at your local paper shop. Read on for instructions!

Step 1: Once you've decided on your words or expression, make template letters out of bristol board or cardstock. 

Step 2: Trace templates on the backside of your glitter paper. Remember to place them backwards, so that they read properly when turned around!


Step 3: Glue glittery letters to templates.


Step 4: Measure your ribbon to fit the wall or doorway where you want to hang it. Starting at the center, tape letters to the ribbon.


Hang it up and you're done! I've found that it hangs well if you leave a bit of slack between the letters and while hanging it. The garland may take a bit of time to make, but the best part is that you can use it over and over. In January, I'll pop mine in a Ziplock bag to keep it safe until next Christmas.


If you want to add a 3D star, like I did, this tutorial by Grey Luster Girl is handy. Why buy one when they're so easy to make? I only made one piece and not two, like she did. Just sketch or trace a star on the back of a piece of thick cardstock or heavy paper, then draw a line connecting each point to the opposite side, as if you were going to fold it in half. Then score along the lines you drew on the backside of the paper using a ruler and a butter knife. Then just fold each point individually. I hung mine with fishing line so it looked like it was suspended in thin air. Magic!


Sidenote: After I made my garland, I came across this Lauren Conrad tutorial for a similar one using a different method.

What do you think of the garland phase in the blogworld? Have you ever made one? If so, feel free to link it up in the comments.

Friday, October 26, 2012

Trick or Treat: Easy Halloween Craft DIY Gift Bag


Look what I made! I offered to make little gift bags for D's niece and nephew, since he wanted to send them some treats for Halloween in the mail. As I was making them, my friend C showed up, so the cute pumpkin treat bag was made by her.


These are so easy to make. Depending on the detail of your design, these could be ready to go in 15 minutes. I used a template on Homemade Gifts Made Easy for the gift bag and then decorated them with paint, construction paper & a micron pen for the spiderwebs.
 
To add an element of surprise to my bag I added a piece of folded construction paper to make the door moveable. A spooky silhouette, a cat in the window and a cracked window makes it look more like a haunted house. How sweet is that ribbon bow that C added to her pumpkin? I think it's adorable.

Speaking of Halloween, D & I are working on our costumes tonight and heading out to a party tomorrow. I will be sure to post a recap on Sunday for you to see. What are your plans for Halloween?

xoxo Janelle

I should have styled these photos, but it was nighttime and i was excited (and tired). I'll do better next time!

Thursday, February 2, 2012

DIY: wine bottle lamp

Look what I made:


Alright, so actually D made it. I just picked up some of the components.

In the summer, we went to a small rummage sale and found the wine bottle filled with dirt and an old socket on top with no shade. The lady at the sale checked the socket for us right there and it worked. So, we brought it home for something like $5. We dumped the dirt out and gave the bottle a good wash.

The hunt for a suitable shade lasted until the fall, when I finally picked up this beige one from HomeSense for $15. The old socket that the bottle came with didn't have a harp piece attached. A harp is the thing that attaches the socket to the lamp shade. I didn't know what it was until it was staring me in the face at Canadian Tire. A harp and a new lamp socket kit set us back $15 total.


After many curse words, an accidentally clipped wire and some wiggling... we have a new lamp! And although in total it cost a little over $30, it's original and I like it, even though it doesn't match our room at all at the moment. It kind of makes me feel like I'm at a beach cottage. I'd like to switch out our brown duvet for a white one when we move in a few months... I love the laid-back, waterfront, chalet vibe for the bedroom. So relaxing...
 
art piece courtesy of my friend, Em!
 
Someday we might drill a hole in the bottom of the bottle, so we don't have to have the wire folded like the photo below, but for now it fits. I may add a little bit of hot glue because it is a little wiggly...
 
 
The best part is that now we can retire our other lamp, whose shade fell off every time you brushed it when trying to turn it off. That's an upgrade, I would say. What do you think?


Friday, December 16, 2011

simple soy candles (tutorial)


A little over a month ago I made these little soy candles and only now am I finally getting around to writing about it. I had to wait until I gifted them and tested them out to make sure they were worth sharing and thankfully, they are! 

I haven't really had time or resources to make them look pretty, but I kind of like how they're unfussy & pure white. Sometimes simple is best. Plus, the scents are delicious! I made apple pie, vanilla sky & unscented. Since some people have asked how I made them, I figured I'd share the details here. There are definitely a ton of ways to make these, but this method worked for me. I used this tutorial as my main guide.

[Simple Soy Candles]

Buy or find:
- Soy wax flakes (I used Yaley brand)
- Medium soy wicking
- Medium wax clips
- Mason jars
- Candle fragrance (optional)

- Candy thermometer
- Large micro-waveable measuring cup/glass jar
- Glue gun/sticks or wick tack
- Baking sheets
- Chopsticks or clothespins
- Pliers

Do this:

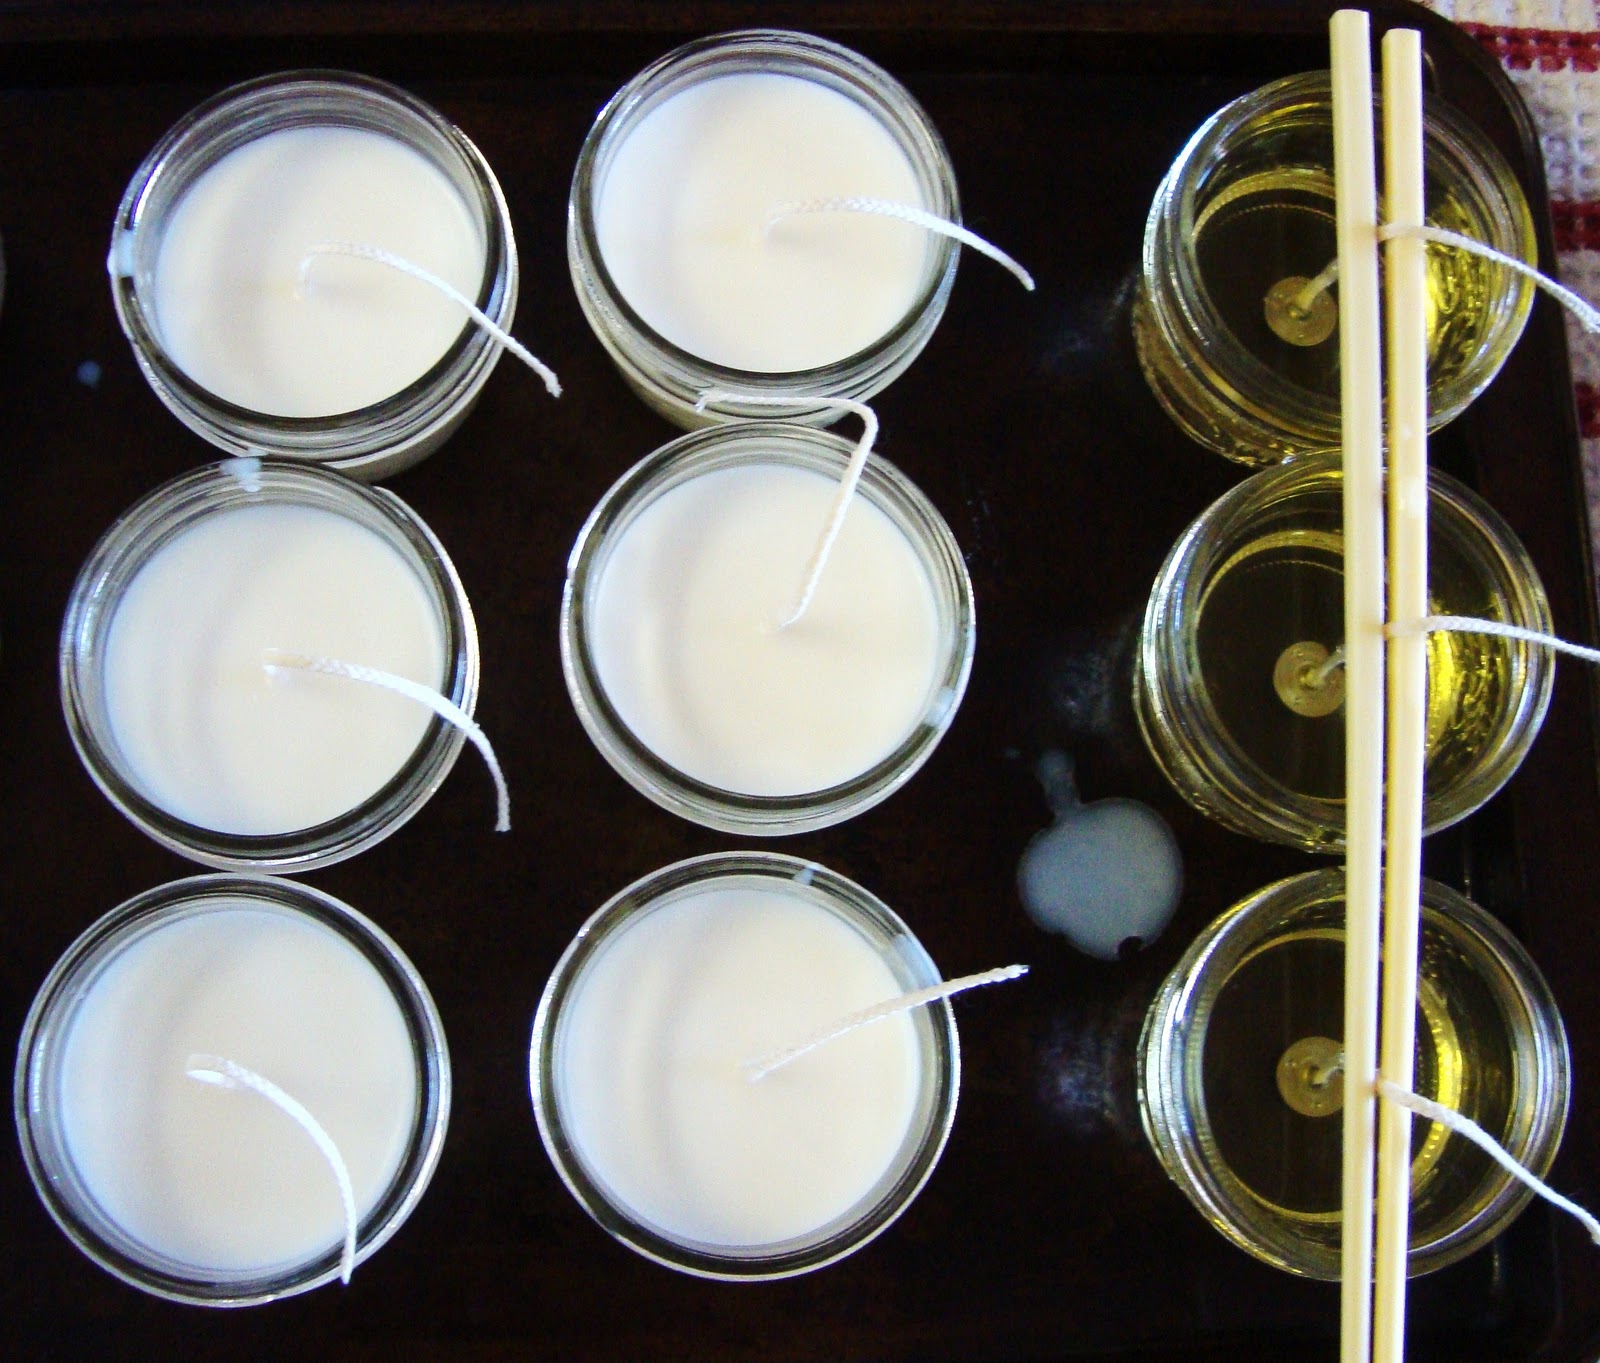
Preheat oven to lowest setting. Pour some wax chips into your glass measuring cup & microwave on high for 4 minutes. If flakes remain, keep melting and stirring with a chopstick until it is all melted down like this.


The temperature of my wax needed to get to 180F so keep on microwaving and retaking the temperature! Follow the instructions on your box & don't forget to remove the thermometer before microwaving! Once the wax reaches 180 you'll need to let it cool to about 120-130F. While it's cooling, prepare your jars.


 Put them on a baking sheet (without their covers) and heat them for 5 mins or so. While they are heating up, take a piece of wicking and measure it so it hangs about 2 inches above your jar and cut. Stick one end into your wick clip, leaving the long end out where the clip sticks up and pinch with your pliers. I know that's mega-confusing, so just look.


Hot glue the bottom of your wick clip to the middle of the inside of your heated jars and arrange them on the baking tray like these ones. Use chopsticks on the tops to keep the wicks standing straight.

Work quickly. If your jars cool down too much you should reheat them. It's okay to put the wick in the oven!


If you're adding fragrance, now is the time. I put in at least 30 drops for 500ml of wax flakes. Add fragrance & stir it up gently. Now slowwwwly pour your wax (cooled to 120-130F) into the jars. Pour a little bit over the wick to help it stand up. 

Let the candles cool for a few hours and DO NOT move the baking sheet. If you do move it the wax will separate from the jar or you may get an uneven top.


Once they've cooled, trim your wicks and you're all done!


Avoid using your new candles for 24-48 hours. They'll last longer if the wax has had a chance to fully set and harden.

Photo credi : Val (one of the gift-recipients and my bestie)

When you finally do get to light them, they'll make you want to cuddle up and watch a movie. They're that cozy. And although soy wax doesn't hold smell as well as paraffin wax, they have a nice soft scent that's not overpowering.

I hope you like them... If you have any questions, feel free to let me know in the comments. 

Thank you for visiting my blog!

Thursday, November 3, 2011

painted pumpkin craft

Guess what I did tonight?

Painted a pumpkin! I've never done this before... I've always been a jack-o-lantern kind of girl. I remember seeing a picture of me helping 'carve' one with my parents when I was about 2 years old. They plopped me right inside the hollowed pumpkin for a photo. So, I guess you can say I have years of experience.... Haha.
In university I carved everything from Lion King to Gaga.

2008 (D & my first pumpkin together..... awwwwwww, yuck. cuteness.)

2009


Yhis year's pumpkin was quite a change. It's after Halloween, so it didn't really feel right to carve, so we went with a fall scene with our girl dog Abby playing in the leaves. On our walk today we were talking about how fun it would be if we could rake up some piles and let her play in them, so I guess this was inspired by that. I also didn't have red or brown paint, but I think I made it work. Abs is looking a bit gray. See for yourself:
ignore the pen marks. ugh.


I love it. It is definitely not perfect in any way, but me and D made it together. He's not really into crafts so when he seems excited & uses the word 'cute' a few times... it's awesome. He also called me a "crazy craft lady" which reminded me too much of a crazy cat lady. Clearly, we had fun. 

How was your night? Did you ever paint a pumpkin?


Sunday, September 18, 2011

DIY Owl Wreath

Hi everyone! I hope your Sunday is off to a good start. Mine, unfortunately, didn't start off so well but it can only get better because I'm going to visit my Nanny this afternoon! It's been about a month since I've seen her last, which is a bit absurd because she only lives a 40 minute bus ride/15 minute drive from the apartment. I love spending time with her mostly because she's hilarious, but also partly (selfishly?) because she feeds me. Very, very well. It's a comfort thing.

Anyway, check out what I made yesterday:


A wreath! I was in the mood to make a fall craft and what's more fall-like than a wreath? I spent the day Saturday gathering what I needed and putting it together. I like how it's simple and can be used for different seasons. Add some white bows and some snowflakes for an instant winter wreath. The owls are meant to be me, D & B. I'm the one with the eyelashes, if you couldn't tell.


I put some music on and hijacked Darryl's desk for the afternoon. I had so much fun making it. It feels so good to be crafting again. I feel like I'm just happier when I create things... even if it's something small or a little gift for someone.

Enough rambling though, here are a few pictures from the process.


These oak buttons are handmade from a guy at the market. How cute would they be on a cozy sweater?


And more shots of the finished product:


A little modesty Brandon!

And now the reason my morning sucked. I woke up to find it was STOLEN last night. Hours after I put it up...

at least I have pictures though, right?

Thanks for looking,

xo Janelle

Monday, September 5, 2011

DIY Paper Heart Headboard

To everyone visiting from Pinterest. Thank you! I'm planning another heart paper craft for this year, so please follow this blog via GFC, BlogLovin or RSS or my "my blog" Pinterest board if you don't want to miss it.

Hey everyone! So I'm finally sitting down to write up the tutorial for the craft I mentioned last week. I made a collection of hanging paper hearts to hang above our bed.

More close-ups below.

I know it might look a little bit, maybe a lot, childish but when it comes to hearts I can't help myself. It's simple: hearts just make me happy. I'll have years to have a formal headboard and serious, adult art. But for now, I'll choose hearts. The best part about this craft is that when I turn the fan on at night, the hearts sound like rain as they hit the wall. Maybe, it's a little romantic? Oh, and I like it much better than my half-assed attempt at an art clothesline. Don't you?


--------------------------------------------

Here's how to make one.

You'll need:
- a few sheets of cardstock in whatever colors you like. I used yellow, cream & white.
- a paper punch. Mine was heart-shaped, but you could do leaves, stars, dots, squares etc.
- a safety pin or needle
- scissors
- fishing line. I used .25mm.
- a plastic or wooden dowel

How to:
First, punch out as many shapes as you need from the cardstock. I used about 144 (12 hearts per strand, 12 strands). If you cut strips and punch in opposite directions, you can get more out of each sheet. 


Once you have all the shapes punched, gently poke a hole at the top and bottom of one heart with your pin/needle. You can also choose to hang your shape on a diagonal or sideways.


Cut a length of fishing line. I cut mine the length of my dowel. String the fishing line through the top hole away from you and then through the bottom hole coming toward you.


Repeat with as many shapes as you need. Then cut another strand of fishing line and repeat, repeat, repeat. I found it helpful to tape my strands up on the wall as I went to prevent them from tangling.  

Once you have all of your strands completed, tie each one to your dowel leaving at least 1inch 1-1/2 inches between each strand to keep them from tangling.


Tie two short lengths of fishing line near each end of the dowel and hang using a couple of thumbtacks. And now, all that's left is to enjoy your new, cheap, easy art.


The view when laying in bed :)

I still have a bunch of hearts left over and have visions of making a mobile for a nursery. The only problem is... I don't know anyone with a baby to give it to. To my friends, can someone have a baby so I can make you a mobile?

Love and hearts,
 Janelle

Photobucket