Showing posts with label decor. Show all posts
Sunday, September 8, 2013
weekend recap | getting stuff done at home
veggies from D's dad | abby waiting patiently for her treat | hedgehog closeup | blurry selfie, since i rarely post my face on here.
This weekend was just what I needed. I think D and I were both craving some time at home to do some cleaning, watch movies and relax.
On Friday night we watched FIBA Americas (basketball). Then on Saturday, I had a laughing fit with the seniors at our dance fitness class. The theme was ABBA and we came up with some pretty creative choreography. "Jump with my baby", turned into us miming being pregnant while hopping up and down. Almost everyone was in stitches. Maybe you had to be there?
Saturday night we watched The Beach - I know. I can't believe it took me this long to watch it. Apparently, it's a classic Leo movie. I liked it, but I feel like it started going downhill about halfway through. The whole gameboy scene was a bit wacky.
Today we got a few things done around the house that we've been procrastinating on. Hung a curtain in the living room (pics soon!), cleaned 3 windows, and hung up this painting I did a while ago.
I try not to see the mistakes when I look at it. I do like the hair though and it's the first of my artwork I've ever framed and hung. Plus I think it coordinates well with the wall colour.
What did you do this weekend? Fill me in.
Thanks for stopping in,
xx Janelle
Thursday, May 23, 2013
goodbye gray : a painted makeover - a paintover?
That said, a room full of neutrals can feel a bit flat - particularly if it's been overcast and drizzly for the past, oh say, ten days.
Although I wasn't quite ready to paint any of our hand-me-down, solid wood furniture just yet, I knew I could easily tackle the concrete (plaster?) planter. It was a Winners find sometime last winter for around $20. And it would give me an excuse to browse the paint chip aisle.
Here's what it looked like before:
See how it kind of blends in to the wall behind it? It looks better in this pic than it does in person.
I was contemplating either a dark teal, sunny yellow or a kelly or emerald green. After I got the nod of approval from D, guess which one I picked... Keep quiet if you saw my sneak peek yesterday ;)
Emerald. Specifically, Eleanor's Emerald by CIL.
Here is how the project went down:
Prepping
- I put my
- I laid down newspaper and then cardboard to protect the floor. The cardboard was easy to peel away from the painted surface, but a drop cloth or plastic tarp would work well too.
- I taped around the inside of the rim with painter's tape for a clean line on the inside. Since the tree is a swirly bugger and actually rests on the rim in one spot, I decided to tape him up too just to be safe. If you squint, you can see this in the bottom right photo below.
Painting
- To get even coverage, I did three thin coats of paint working my way around. In hindsight, I probably should have used primer first but since this tree will stay inside (at least for now) it'll be fine. If you plan to house yours outdoors, I would recommend priming, and also using a sealant afterwards. Gotta protect it from the elements.
- I peeled off the tape after painting & slid the planter back in its place.
PS: I listened to Design*Sponge answer FAQs about their blog while I painted. Grace & Amy were so lively to listen to - a welcomed distraction!
After
I have to admit when I decided on green I was a bit nervous about it being too much green with the leaves and all, but I intentionally chose a green that was more blue since I knew the plant had yellow undertones. This gives it a bit more contrast than if the planter was a lime-y colour.
Here's how it turned out:
I'm so happy with it. Every time I walk into the room my eye goes right to that corner. Thankfully, it helps distract from the fact that there is a Star Wars poster hanging above it. I know how to pick my battles when it comes to decorating...
It's surprising how painting an accessory can have a big impact. And now that it's done - I've been thinking about what else I could do to tie the room together. Next on the docket:
- Hang curtain rod & panel on the window
- Fix the lack of closet door situation
- Re-organize bookshelf
- Get diploma from home & hang it up
Are you an emerald fan?
If you did any decor projects recently, feel free to link up in the comments, I'd love to see!
xx Janelle
Wednesday, May 22, 2013
small apartment : show me the green
I painted something this past weekend. And wouldn't you know it's in Pantone's Color of the Year for 2013 --- Emerald.
I'll spill the details soon. My brain is just feeling a bit foggy from so much computer time at work and in the evenings. Time to switch off for the night.
Any guesses on what has been given a new life with this splashy green?
See you soon (I promise!),
xx Janelle
Monday, April 1, 2013
brighten up a small apartment bathroom with $10
Apartments have the weirdest bathrooms. Especially, old houses converted into flats. Although our last apartment was in a tower, it still had it's fair share of design flaws. There was a grate in the ceiling (apparently for venting) but the bathroom had no fan or window and therefore, no airflow. As you can imagine, we had major mould issues. After a particularly hot shower, the condensation would actually drip down the walls leaving little slug lines. It was gross.
Guys, our new apartment has a fan. It's so luxurious! Oddly enough, it also has a window in the shower and a half-wall made of those see-through blocks, which I think are from the eighties. Do you know what ones I mean? The door is a sliding barn door, which I admit would be pretty cool, if it didn't leave a four inch gap on one side and had a working lock.
There's a point to all this, I promise! Keep reading...
The fact that I'm pointing out all of my bathroom quirks might make you think I don't like it, but I do! I really do. Despite the fact that it's tiny, there is a ton of storage and it has the perfect little nook for our plastic storage drawers which hold towels and toiletries and ten thousand bottles of shampoo. A wall-mounted sink also means no countertop clutter, since everything is hidden away in the mirrored cabinet. If I'm given a counter, I will clutter it, so this is a blessing. Thank you, apartment bathroom gods.
Onto the upgrade! All you have to do for this one is shop. Zero handiwork and/or tools needed.
Along with all of their weird features, apartment bathrooms can be a little blah. Our current beige bathroom desperately needed a little colour, so I bought a purple orchid, put it in a handmade clay dish and set it on the toilet tank. It's amazing how much of a difference it made. The blooms really pop against the white fixtures and shower curtain. This one was only ten bucks (!!) at Superstore, but I know they have them at Sobeys too.
How to NOT kill a mini orchid: Stick it by a sunny window. Water it once a week with a tablespoon of cold water.
Never though I'd be dishing out plant advice, but here I am. One mini purple orchid makes a dingy apartment bathroom seem a bit brighter!
Spring is here!
xx Janelle
PS - I'm sorry this post has my toilet in it. Just focus on the flower!
PPS - I have a long-awaited series of green cleaning posts coming up very soon. Made specially for lazygirls, like me!
Guys, our new apartment has a fan. It's so luxurious! Oddly enough, it also has a window in the shower and a half-wall made of those see-through blocks, which I think are from the eighties. Do you know what ones I mean? The door is a sliding barn door, which I admit would be pretty cool, if it didn't leave a four inch gap on one side and had a working lock.
There's a point to all this, I promise! Keep reading...
The fact that I'm pointing out all of my bathroom quirks might make you think I don't like it, but I do! I really do. Despite the fact that it's tiny, there is a ton of storage and it has the perfect little nook for our plastic storage drawers which hold towels and toiletries and ten thousand bottles of shampoo. A wall-mounted sink also means no countertop clutter, since everything is hidden away in the mirrored cabinet. If I'm given a counter, I will clutter it, so this is a blessing. Thank you, apartment bathroom gods.
Onto the upgrade! All you have to do for this one is shop. Zero handiwork and/or tools needed.
Along with all of their weird features, apartment bathrooms can be a little blah. Our current beige bathroom desperately needed a little colour, so I bought a purple orchid, put it in a handmade clay dish and set it on the toilet tank. It's amazing how much of a difference it made. The blooms really pop against the white fixtures and shower curtain. This one was only ten bucks (!!) at Superstore, but I know they have them at Sobeys too.
I swear these flowers were made for people who can't keep a plant alive. I have somehow managed to kill every plant or flower given to me, so I can say this with certainty! This pretty lady is still kicking one month later. Not only is it still alive, but it's actually thriving. New blooms just keep popping up. I've also taken to excitedly announcing each new bloom to D. He's somewhat less enthusiastic about it than I am.
Never though I'd be dishing out plant advice, but here I am. One mini purple orchid makes a dingy apartment bathroom seem a bit brighter!
Spring is here!
xx Janelle
PS - I'm sorry this post has my toilet in it. Just focus on the flower!
PPS - I have a long-awaited series of green cleaning posts coming up very soon. Made specially for lazygirls, like me!
Friday, November 30, 2012
decking those halls, baby : sneak peek of my Christmas color scheme!
I have a rule that I cannot listen to seasonal songs until Dec. 1st. The idea stemmed from the thought I had that I will have to listen to Christmas tunes for the rest of my life - the same 30-ish songs, by various artists, year after year, for the rest of my (hopefully!) long life. If you're thinking I don't have to listen to those songs, you would technically be right, however, I do some shopping around this time of year in malls & local shops; places where most managers that seem to think that November is the perfect time to start playing said songs. Okay, so I guess my rule should read: I will not play Christmas music until Dec 1st.
Warm sweaters, hot drinks, cuddles and a dog licking glitter off the floor.
Here are a few of my inspiration pics from Pinterest:
![]() |
| Flickr via Ticklish From A Distance |
![]() |
| From The Right Bank via Apartment Therapy |
![]() |
| via Canadian House & Home |
![]() |
| via Matchbook Mag blog |
Did you decorate your place yet? Leave your links in the comments, I love some holiday eye candy.
Thursday, February 2, 2012
DIY: wine bottle lamp
Look what I made:
Alright, so actually D made it. I just picked up some of the components.
In the summer, we went to a small rummage sale and found the wine bottle filled with dirt and an old socket on top with no shade. The lady at the sale checked the socket for us right there and it worked. So, we brought it home for something like $5. We dumped the dirt out and gave the bottle a good wash.
The hunt for a suitable shade lasted until the fall, when I finally picked up this beige one from HomeSense for $15. The old socket that the bottle came with didn't have a harp piece attached. A harp is the thing that attaches the socket to the lamp shade. I didn't know what it was until it was staring me in the face at Canadian Tire. A harp and a new lamp socket kit set us back $15 total.
After many curse words, an accidentally clipped wire and some wiggling... we have a new lamp! And although in total it cost a little over $30, it's original and I like it, even though it doesn't match our room at all at the moment. It kind of makes me feel like I'm at a beach cottage. I'd like to switch out our brown duvet for a white one when we move in a few months... I love the laid-back, waterfront, chalet vibe for the bedroom. So relaxing...
In the summer, we went to a small rummage sale and found the wine bottle filled with dirt and an old socket on top with no shade. The lady at the sale checked the socket for us right there and it worked. So, we brought it home for something like $5. We dumped the dirt out and gave the bottle a good wash.
The hunt for a suitable shade lasted until the fall, when I finally picked up this beige one from HomeSense for $15. The old socket that the bottle came with didn't have a harp piece attached. A harp is the thing that attaches the socket to the lamp shade. I didn't know what it was until it was staring me in the face at Canadian Tire. A harp and a new lamp socket kit set us back $15 total.
| art piece courtesy of my friend, Em! |
Someday we might drill a hole in the bottom of the bottle, so we don't have to have the wire folded like the photo below, but for now it fits. I may add a little bit of hot glue because it is a little wiggly...
The best part is that now we can retire our other lamp, whose shade fell off every time you brushed it when trying to turn it off. That's an upgrade, I would say. What do you think?
Sunday, September 18, 2011
DIY Owl Wreath
Hi everyone! I hope your Sunday is off to a good start. Mine, unfortunately, didn't start off so well but it can only get better because I'm going to visit my Nanny this afternoon! It's been about a month since I've seen her last, which is a bit absurd because she only lives a 40 minute bus ride/15 minute drive from the apartment. I love spending time with her mostly because she's hilarious, but also partly (selfishly?) because she feeds me. Very, very well. It's a comfort thing.
Anyway, check out what I made yesterday:
A wreath! I was in the mood to make a fall craft and what's more fall-like than a wreath? I spent the day Saturday gathering what I needed and putting it together. I like how it's simple and can be used for different seasons. Add some white bows and some snowflakes for an instant winter wreath. The owls are meant to be me, D & B. I'm the one with the eyelashes, if you couldn't tell.
I put some music on and hijacked Darryl's desk for the afternoon. I had so much fun making it. It feels so good to be crafting again. I feel like I'm just happier when I create things... even if it's something small or a little gift for someone.
Enough rambling though, here are a few pictures from the process.
These oak buttons are handmade from a guy at the market. How cute would they be on a cozy sweater?
And more shots of the finished product:
![]() |
| A little modesty Brandon! |
And now the reason my morning sucked. I woke up to find it was STOLEN last night. Hours after I put it up...
at least I have pictures though, right?
Thanks for looking,
xo Janelle
Sunday, September 11, 2011
Steppin Out Saturday: Property Virgins
Hope you're enjoying your Sunday. I know it's a sad day for many, many people...
------------------
Yesterday D, B, B's girlfriend C and I went to visit some million dollar homes. The local hospital puts on a charity lottery every year and the prizes are pretty amazing: trips, homes, iPods, luggage etc. C asked me about week ago if we wanted to check out 2 of the showhomes in Hammonds Plains. Being the HGTV-loving/nosy person that I am, of course I agreed!
The million dollar home had very nice finishes & fixtures and had lots of storage space. I loved the walk-in closets in every bedroom. Also, the master ensuite bathroom was very, very pretty. It had a modern free-standing tub, a glass shower with a rain showerhead and 2 separate vanities with sparkly wall sconces. The decorating in the rest of the house though, was not to my taste. There was little continuity of color or style and they had a lot of pale green with red.
The half-million dollar home was much more my style. It had a lot of interesting features. For one, the doors were all painted a deep gray color. I've never seen that before but it looked incredibly chic, especially with the white molding surrounding it and the pewter handles. The house also had a beautiful natural slate fireplace in the living area. D thought the decor was a bit too modern, but I think you could warm it up and add your own personal touches.
While walking back to the car we found an actual open house, so we decided to take a peek. Although I felt a bit out of place going to see an $835,000 house, it was so fun! The guy asked us if we were "in the market", bless his heart. The house was nice and open with an amazing eat-in kitchen with tons and tons of cupboard space. The floors were hardwood and very flat, lightly striped tile. Gorgeous! It had a finished basement with plenty of space for a rec room, games space, home theatre AND work-out area. It also had a partial lake views. Swoon!
------------------
Yesterday D, B, B's girlfriend C and I went to visit some million dollar homes. The local hospital puts on a charity lottery every year and the prizes are pretty amazing: trips, homes, iPods, luggage etc. C asked me about week ago if we wanted to check out 2 of the showhomes in Hammonds Plains. Being the HGTV-loving/nosy person that I am, of course I agreed!
The million dollar home had very nice finishes & fixtures and had lots of storage space. I loved the walk-in closets in every bedroom. Also, the master ensuite bathroom was very, very pretty. It had a modern free-standing tub, a glass shower with a rain showerhead and 2 separate vanities with sparkly wall sconces. The decorating in the rest of the house though, was not to my taste. There was little continuity of color or style and they had a lot of pale green with red.
The half-million dollar home was much more my style. It had a lot of interesting features. For one, the doors were all painted a deep gray color. I've never seen that before but it looked incredibly chic, especially with the white molding surrounding it and the pewter handles. The house also had a beautiful natural slate fireplace in the living area. D thought the decor was a bit too modern, but I think you could warm it up and add your own personal touches.
While walking back to the car we found an actual open house, so we decided to take a peek. Although I felt a bit out of place going to see an $835,000 house, it was so fun! The guy asked us if we were "in the market", bless his heart. The house was nice and open with an amazing eat-in kitchen with tons and tons of cupboard space. The floors were hardwood and very flat, lightly striped tile. Gorgeous! It had a finished basement with plenty of space for a rec room, games space, home theatre AND work-out area. It also had a partial lake views. Swoon!
Swoon is also the name of a little artsy, antique, vintage art gallery shop that we popped into on the way home. It was overpriced for my budget, but I really enjoyed looking. C & I found an entire room of salt and pepper shakers. Once we had explored the shop, we went for a quick lunch at Jack Astors. Later on, D & I went to see Contagion while B & C went to a Celtic Thunder concert. All in all, it was a fun Saturday. I think I may have found a new hobby.... exploring open houses.
And to link up with Mandy @ Harpers Happenings for Steppin Out Saturday, here's what I wore. Please ignore the squinty awkward faces. K? Thanks!
Sunglasses: Rickis
Earrings: Wal-Mart (They're hidden but they're turquoise drops)
Blazer: Ya Los Angeles, from Biscuit General Store (less than half-price!)
White, sequined tank: Joe Fresh
Jeans: Urban Planet
Thanks for reading. Come back on Tuesday for baked zucchini sticks, if you'd like!
And to link up with Mandy @ Harpers Happenings for Steppin Out Saturday, here's what I wore. Please ignore the squinty awkward faces. K? Thanks!
| Can you spot my little model? |
Earrings: Wal-Mart (They're hidden but they're turquoise drops)
Blazer: Ya Los Angeles, from Biscuit General Store (less than half-price!)
White, sequined tank: Joe Fresh
Jeans: Urban Planet
Thanks for reading. Come back on Tuesday for baked zucchini sticks, if you'd like!
Love & slobbery dog kisses,
Janelle
Friday, August 19, 2011
Casa Friday Confession: I'm a rug hater.
Hello lovely readers,
What do you think about rugs? Love them? Hate them? Don't know how to clean them? As you can tell by the title, I'm a hater. We never had rugs around growing up. This is probably because when I was about 3 or 4 I slipped on one and smacked my head on my metal bed frame. I imagine all the rugs in our home went to rug heaven after that little accident. Or it could have been because we had 2 cats and trying to keep rugs clean when you have cats is a big old waste of time.
I had one white shaggy rug in university between mine & Sono's bed. It got absolutely covered in hair and ended up looking more beige than white. Nasty, I know. Why am I even telling you this? Unnecessary details. Anyhow, I've started thinking about maybe having a rug in the living room to make it feel more cozy, since we do have hardwood. I'm thinking I'd like a more natural material, possibly jute or linen. Do rugs even come in linen? I don't know what I'm talking about. I basically want something that is very flat and vaccuum-able, so no shag, but that brings a bit of life to this box we call an apartment.
I like these ones:
![]() |
| Fun rug that's still neutral from West Elm |
![]() |
| Natural jute rug from Home Decorators |
![]() |
| From Sears, $1000. Yikes! |
I gotta wrap this up because I have a date tonight! Teehee. I'll try to post for Steppin Out Saturday on Sunday with a travel outfit or two. Until then, have a great weekend!
xx Janelle
xx Janelle
Friday, July 8, 2011
Casa Fridays: colorful art for a rainy day.
![]() |
| Photo from Baby Blackbird |
I was so inspired when I saw this tutorial image on Pinterest, but when I clicked to the final product I was blown away by the possibilities.
Brandy from Baby Blackbird and her kiddos made this as a Father's Day gift for her husband/their dad. See the actual tutorial here. Isn't it sweet? All they did was take vinyl reusable sticker letters, stuck them on a blank canvas, painted over the whole canvas and then took them off. It's so simple, not to mention inexpensive, but the part that tickles my fancy is that you can make such a range of pieces of art using the same idea. Can you tell how excited I am?
I'm definitely going to make one of these, it's just a matter of narrowing down my options for color, words, shapes, brush strokes etc. I might try using song lyrics or a quote that I like.
Brandy from Baby Blackbird and her kiddos made this as a Father's Day gift for her husband/their dad. See the actual tutorial here. Isn't it sweet? All they did was take vinyl reusable sticker letters, stuck them on a blank canvas, painted over the whole canvas and then took them off. It's so simple, not to mention inexpensive, but the part that tickles my fancy is that you can make such a range of pieces of art using the same idea. Can you tell how excited I am?
I'm definitely going to make one of these, it's just a matter of narrowing down my options for color, words, shapes, brush strokes etc. I might try using song lyrics or a quote that I like.
For a different variation, you could use round brush strokes for a hypnotizing effect or you could do various shades of all one color for a softer, soothing look. I would like to see what covering the whole canvas with words would look like. Too. Many. Options.
What do you think? Am I a little over-enthused? I think it's because our apartment is really crying for a fun piece of art and a lot more color. I'm looking to bring color into the bedroom by doing a hanging project where the clothesline is. Stay tuned for that little update in a couple weeks!
This weekend my parents are paying me a visit and we're going to hit up the Farmer's market tomorrow morning, shop around in the day and have the rest of the family over for pulled pork. And you know I go a little nutzo for pulled pork, so it should be a fun time. See you on Monday for a little weekend re-cap. I hope you have a great weekend full of sunshine!
xo Janelle
What do you think? Am I a little over-enthused? I think it's because our apartment is really crying for a fun piece of art and a lot more color. I'm looking to bring color into the bedroom by doing a hanging project where the clothesline is. Stay tuned for that little update in a couple weeks!
This weekend my parents are paying me a visit and we're going to hit up the Farmer's market tomorrow morning, shop around in the day and have the rest of the family over for pulled pork. And you know I go a little nutzo for pulled pork, so it should be a fun time. See you on Monday for a little weekend re-cap. I hope you have a great weekend full of sunshine!
xo Janelle
Friday, June 17, 2011
Casa Fridays: Simple Clothesline Art
Happy weekend! Today I want to keep with the theme of bedrooms and share a quick art idea. I would love to have beautiful art hanging above my bed, but I don't. I stared at the blank wall above it for months before deciding to do something anything to make it look a little less empty.
| Well hello there! |
So while I wait for the right piece of art to come along, or the inspiration hits to make my own art, I've set up a little art clothesline. This is not by any means an original idea. I've seen other clotheslines all over the internet, but I thought I'd share because it's such an easy project that you can adapt to suit different rooms and styles. Here's what mine looks like at the moment:
It only takes about 2 minutes to set up. All you need is a piece of ribbon or cotton twine, a handful of clothespins and a couple of push pins. To start, push a pin into the wall where you would like one end to be. Tie a bit of twine around the pin and pull the string over to where you want the opposite end to be. Push the other pin in and tie the string around it. Cut the end and you're done.
The fun part is choosing what to hang on it. I cut out a couple of pictures from 7 Mondays (Mount A's photo/poetry journal) and put a greeting card from Nanase in the middle. It looks a little empty in the photo, but I'm looking to switch it up in the next week or so. I'll update you when I do! Another great part about this project is that it's so easy to switch up. You can hang objects, shapes or art prints. You can use colored clothespins or plain ones.
Here are a few cute clothesline ideas:
![]() | |
| From Danielle Thompson's blog. |
![]() |
| From Apartment Therapy's gallery |
Wouldn't it be nice to have an inspiration clothesline above a work desk? I can sure use a little pick-me-up to keep me motivated...
![]() |
| From Dollar Store Cratfts |
I think this would look cute in a baby's room. And this next one would be perfect for a kid's room too because you could switch out the flash cards with homemade art.
![]() |
| From YoungHouseLove |
And, what a perfect way to display Christmas or Birthday cards. You wouldn't even need clothespins because you could just fold the cards over the string. I even made one of these for my co-workers birthday and just made 3 small signs saying 'Happy', 'Birthday' & 'Abby'. It was simple, but still looked a lot better than a paper sign sticky tacked to the wall. So, if you've got a spare wall that's in need of some art but you don't want to make nail holes or bother to pick out the perfect art piece, you should try clothesline art.
Have a great weekend,
xo Janelle
Have a great weekend,
xo Janelle
Saturday, June 11, 2011
Casa Fridays: Duvet Covers
I hope you all had a great day today! I had a special day today but now I'm lying in bed with no pants on (shhh- I have a long top!) and I'm just about ready to catch some sleep. But I figured since I was cuddled up--alone--I would do a quick post on bedding.
One of my favorite things about moving to a new place, or upgrading to a bigger bed size is buying a new duvet cover. Yes, I had a twin bed up until I moved to Halifax 9 months ago... fine for one person, dangerous for two.
When I "inherited" a double bed in this apartment my parents decided to buy me a simple brown duvet cover they found for quite a steal ($20). It's a good, solid color and it held up fairly well until I noticed some fading on one side from the sun. So, I flipped it. And now it's probably fading this side.... The point is that eventually I will have to buy a new one and I've been thinking about what color/style to go with.
Want to see some of my favorites?
I love the subtle grey tones in this organic cotton one by Amenity.
Aren't the cheery yellow tones in this one from Pottery Barn energizing? I think it would look beautiful in a room that gets a lot of sun in the morning.
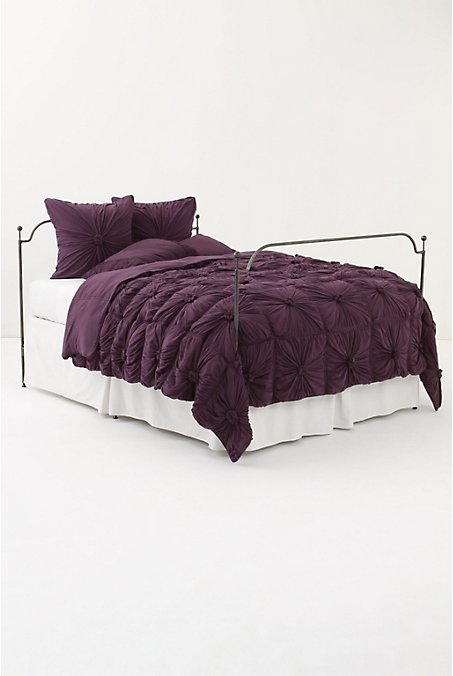
If I had my own room I'd go for this luxurious, soft, feminine duvet cover in my favorite color from Anthropologie. The more I look at it though, those knobs are starting to look like the buns on Sumo wrestlers' heads.
No? Oh my. What is wrong with me?
Although some people find white bedding too stuffy or "hospital-like", I disagree. Because white linens remind me of spas and hotels, I find white bedding to be very relaxing and inviting. To keep the cover from looking boring, I look for some sort of visual interest whether it's a ruffle on the hem, a waffle-weave texture (for a casual, cabin vibe) or a light strip like the Bed Bath & Beyond one in the pic.
You're going to think I'm completely obsessed with bedding after this next confession, but I'll tell you anyway. The bedding from the set of PS I Love You is awesome. It's a brown duvet cover with an almost-celtic design in white or vice versa. It's very cute, you should look for it the next time you're watching it.
As you can tell from my pics, I like a little bit of everything, but I'm not crazy on a ton of print and color on the same blanket.
What are your favorite bedding styles? Bright colors or darks? Prints or solids?
Goodnight,
xo Janelle
Subscribe to:
Posts (Atom)