Showing posts with label craft. Show all posts

Wednesday, October 30, 2013

Halloween Tag | lambchops & chocolate

I normally never do these, but I was tagged by my real-life friend Val from Making It Sparkle, so I had to say yes.

If you're not into these types of things, come back next week for a Fall favorites post inspired by my friend Jamie's YouTube channel. I'm hoping to share some of my well-loved items for Fall. Some food, some clothes, some home comforts. Oh, and don't worry there will be no mention of pumpkin spiced lattes! Promise.

THE HALLOWEEN TAG 
 
1. What is your favorite Halloween movie?
Hmm, well considering I can't handle scary movies at all... probably something more suspensful. Maybe Black Magic, although I haven't seen that one in years. I'm more into Christmas movies. I think it's still too early to watch Elf though. I have strict rules about these things.


2.  What was your favorite costume?
Ah, so many to choose from! I'm one of those annoying people who gets overly excited about dressing up in costume. I was a dance and theatre kid back in grade school. That should explain some of it.

Here's my favorite costume I've thrown together:


I got to become my beloved childhood best friend, my stuffed animal Lambchops. Every little girl's dream.


Please ignore how scary I look in the top right photo. I know it's Halloween and I was cold, but still.


3.  Do you like haunted houses?
No. Not even a little bit.

One year I succumbed to peer pressure and went to to a haunted walk at a zoo with friends. This was a terrible idea. The thought of going through these enclosed spaces while people jumped out at me with blood all over themselves and holding weapons was too much for me. I got about one or two steps into one of the exhibits and darted back out. So, I waited outside after each one. All night. While seven year olds went through without batting an eye.

4.  What's your favorite candy?
Chocolate or sour candy.


5.  Do you decorate for Halloween?
I don't now, but if we had a house we would put a few pumpkins out. No skeletons and bones though.... not really our style.

 
6.  Do you still dress up for Halloween? If yes, what will you be this year?
I always do, if there's a party to go to. This year, I planned to be a mermaid, but I couldn't make it to the fabric store, so I'm going as a swamp lady instead. There will be drapey fishnet fabric, painted on fish scales and fake seaweed. I'll make it work!


7.  What is the one Halloween candy you can't stand?
Those taffy's wrapped in the orange and black wrappers. Ick.

8.  What's your best Halloween memory?
Trick or treating around my subdivision as a kid. There were quaite a few houses which meant a decent candy haul. We always collected our candy in pillowcases. Did you guys do that?


9.  What song comes to mind when you think of Halloween?
The monster mash.


10.  What's your favorite part of Halloween?
Cute kids in costumes. Little superman's & fairies melt my heart!


11.  Would you rather trick or treat?
Treats!


12.  Candy Corn- Take It or Leave It?
Ew.
 
13.  If a black cat crosses your path, what do you do?
Call it towards me so I can pat it. Here kitty, kitty, kitty....


14.  Do you carve/decorate pumpkins?
Yes! I haven't the past couple of years though. I painted one a few years ago and it was really enjoyable so I think I'll do that again soon.


15.  How old were you when you stopped Trick-or-Treating?
16? I still remember feeling too old for it at that point, but some teens in the neighborhood still did it. I guess I'm a sucker for free candy.
I was a banana that year. A hellow hoodie and a sign on my chest that said "Yes, I'm a banana". I hope you don't feel jealous of how cool I was... Haha.


16.  Festive Nail Art- Yes or No?
Subtle nail art is good. Black with silver, a deep burnt orange or peach, but no long red claws for me.

I hope your Halloween is extra sweet. Happy trick or treating!

xx
Janelle

Monday, March 18, 2013

just try : first attempts at collage art

When I was in grade six I made collages on old wine bottles. Did any of you guys do that too? I thought I was so sophisticated. 

I gave one of my "art bottles" to my Nanny as a gift with a burgundy ribbon tied around it's neck and she still has it! I couldn't believe it when I spotted it on top of her kitchen cupboards. The pictures give quite an insight into 90s trends with an NYSYNC CD and some glitter nailpolish. Oh, and alongside words like style, love and pretty shoes is a carefully cut out photo of a tub of Cool Whip. Yep, I was a pretty typical eleven year old.

Anyway, that was the last thing I remember collaging... until this:
Sometime in May 2011, I hatched the idea that I was going to make a world map out of recycled magazine pages punched into little circles. Two years later and I am still working away at it. I shouldn't say working - as if it were actually in progress. I do it for an hour one day and then don't touch it again for 3 months. If I sit down to work on it, I have to commit to at least an hour, otherwise I spend more time setting up the circles than pasting them.

Last fall, I wanted to branch out a bit and explore collage outside of my map project. This was around the same time I discovered the incredibly talented, Patrick Bremer. And so, without too much thought I churned out this piece:

© Janelle @ Two Cups of Happy, 2012

Yep, cereal. I tried to make all of the colours "normal" inside the bowl and a bit technicolour on the outside, including blue milk! I ripped pieces by hand from old magazines and pasted them down with Mod Podge. I kept it pretty one dimensional with an aerial view and didn't get into shading very much. Keeping it simple on the first second try was a great idea. It was finished in two sessions and was fairly easy to put together.

Soon to follow was this next one, inspired by an old travel photo my parents took. You already had a sneak peek of it here.

© Janelle @ Two Cups of Happy, 2013

I took more time to plan this second one. I chose a scene I loved, sketched out a basic outline and decided to keep the colors muted like in the photo. The triangles around the edge were an impulsive choice, but I actually like how they extend the borders of the scene and give it some continuation.

There are some mistakes in these that seem to glare at me (esp. in the last one), but I am learning to appreciate each piece for what it is. They're the result of a challenge. And I have to say, I'm a little proud of that last one. It's not terrible! Sometimes I surprise myself when I just try.
 
What's one creative thing you've always wanted to try but were a little intimidated? Crafty/artsy/DIY or whatever... Let me know in the comments!

xx Janelle

Tuesday, February 12, 2013

last-minute washi tape valentines (for the young at heart)


Do you guys know about washi tape? I started noticing some projects pop up on Pinterest last fall and being the craft supply hoarder that I am, I had to get my hands some ASAP. Washi tape, in case you are still in the dark like I was, is a thin, decorative masking tape that looks like this.


It works really well to tack up photos/art instead of framing and is great for gift wrapping too. All major creative supplies stores like Michael's, DeSerres sell it and many small, local craft shops too. It should come as no surprise that it originated in Japan - every cute fad was big in Japan 5 years before it ever became cool in North America. Proof? Hello Kitty, maxi skirts, Harajuku style, bows. Case in point. On to the Valentines!

Most of you probably stopped giving them out years ago, you know, like, when you started grade six. I did too actually, but I made some on a whim last year to mail to a few university friends who I missed. This year, I got the itch again. D's niece and nephew were also coming to visit so I wanted to be able to give them a little something for the holiday. Here they are:


These are super-easy to make. All you need is washi tape, cardstock & pens. 1. Trace around a business card to make your base. 2. Press down a strip (or two!) of tape. 3. Write a lovey message. 

That's seriously all there is to it! These probably took no more than 5-10 minutes to make. The hardest part is deciding what to write on them. Once you get into a rhythm, it's easy to make a bunch at once. I think they'd be great for kids to bring to school or you could give them to your neighbours. These ones will be going to my co-workers - shhh! Don't tell.

Do any of you still give out Valentines or make a special card for your loved one? Got any washi tape projects for me to check out? Let me know!

xx Janelle

PS - I took these photos at night, which explains the laughable white balance. Forgive me! It's winter and it gets dark before I even get home...

Sunday, December 23, 2012

4 Step DIY Glitter Garland - with no mess!


When I posted my Christmas decor sneak peek a few weeks ago, I had no idea what to do with the supplies. All I had was a colour scheme, paper, some ribbon and a strict budget. Inspired by the image of "c'est noel" posted on someone's front door, I decided to make a glitter garland with the same expression.

I grew up in a French town in New Brunswick and my father's parents are/were Francophone so we have always kept traditions, customs and carols from our French culture. Apparently, my French spelling skills need some practice though, because on my banner the two little dots are supposed to be over the E and not the O. Oops! This year, I decided that I would like to try to work this into our own (me & D's) celebrations and what better place to start, than with decorating? 

The trick to keeping this glitter craft mess-free is to use pre-made glitter paper, instead of gluing loose glitter to plain paper. I bought a large sheet of gold glittery gift wrap (made by the adorable Rifle Paper Co) from my favorite local stationery store Duly Noted. Rifle Paper Co doesn't seem to be carrying any in their online shop at the moment, but you can find some at Paper Source or at your local paper shop. Read on for instructions!

Step 1: Once you've decided on your words or expression, make template letters out of bristol board or cardstock. 

Step 2: Trace templates on the backside of your glitter paper. Remember to place them backwards, so that they read properly when turned around!


Step 3: Glue glittery letters to templates.


Step 4: Measure your ribbon to fit the wall or doorway where you want to hang it. Starting at the center, tape letters to the ribbon.


Hang it up and you're done! I've found that it hangs well if you leave a bit of slack between the letters and while hanging it. The garland may take a bit of time to make, but the best part is that you can use it over and over. In January, I'll pop mine in a Ziplock bag to keep it safe until next Christmas.


If you want to add a 3D star, like I did, this tutorial by Grey Luster Girl is handy. Why buy one when they're so easy to make? I only made one piece and not two, like she did. Just sketch or trace a star on the back of a piece of thick cardstock or heavy paper, then draw a line connecting each point to the opposite side, as if you were going to fold it in half. Then score along the lines you drew on the backside of the paper using a ruler and a butter knife. Then just fold each point individually. I hung mine with fishing line so it looked like it was suspended in thin air. Magic!


Sidenote: After I made my garland, I came across this Lauren Conrad tutorial for a similar one using a different method.

What do you think of the garland phase in the blogworld? Have you ever made one? If so, feel free to link it up in the comments.

Wednesday, December 19, 2012

stormed in?


Today was an unexpected day. A big kicker of a storm put a wrench in my travel plans, which meant that I suddenly had an extra day with nothing to do. So, I did stuff. I'm a Maritimer. No storm is going to keep me inside.

Abby needed to go get a routine "procedure" at the vet, so I called to see if they had an opening and two people had cancelled because of the weather. Around ten, I bundled up, zipped up my rain coat, pulled on my rubber boots and we were on our way through the rain, snow and slush to the vet's. I think it's quite amazing how in the span of ten minutes, the weather in Halifax can pass through almost every type of precipitation/cloud cover. Oh, and top it all off with some heavy winds. It's not so fun to walk through, but I do enjoy listening to a good storm rage while I'm inside under the covers.

Once I was back inside, I took a few photos of myself hoping you would be able to see how cozy I was in my gray sweater, favorite heart shirt and sweats but they turned out blurry. This was the best one. Here's what I look like with my hair up while I'm loungin.


After a bit of blog browsing, I followed through on my plans to bake some cookies. Some to bring to my family's home, some to give to D for his parents. Okay, a lot to bring home - probably about 30 cookies. I made a double batch!


Once all of the cookies had come out of the oven, I set out again to pick up my brother's gift from a local shop. While downtown, I also swung by the library to pick up a few books for the slow moments while at home.

Tonight, once D came back from work, I decided to finish up the rest of my wrapping. I'm happy with how it turned out. We had the snowflake wrap left over from last year and I bought a couple of rolls of kraft paper, some washi tape and some teal ribbon to go with my Christmas colour scheme. I didn't have any gift tags, so I just cut some letters out of card stock and wrote my nickname on them. Done and done!


I tackled my wrapping in three short spurts. Although I confessed to enjoying wrapping last week, it still takes a bit of time to get the packages ready with all the embellishments, tags, bows and ribbon. Time well spent though, it was fun.

What did you guys do today? Any holiday adventures?

Friday, October 26, 2012

Trick or Treat: Easy Halloween Craft DIY Gift Bag


Look what I made! I offered to make little gift bags for D's niece and nephew, since he wanted to send them some treats for Halloween in the mail. As I was making them, my friend C showed up, so the cute pumpkin treat bag was made by her.


These are so easy to make. Depending on the detail of your design, these could be ready to go in 15 minutes. I used a template on Homemade Gifts Made Easy for the gift bag and then decorated them with paint, construction paper & a micron pen for the spiderwebs.
 
To add an element of surprise to my bag I added a piece of folded construction paper to make the door moveable. A spooky silhouette, a cat in the window and a cracked window makes it look more like a haunted house. How sweet is that ribbon bow that C added to her pumpkin? I think it's adorable.

Speaking of Halloween, D & I are working on our costumes tonight and heading out to a party tomorrow. I will be sure to post a recap on Sunday for you to see. What are your plans for Halloween?

xoxo Janelle

I should have styled these photos, but it was nighttime and i was excited (and tired). I'll do better next time!

Saturday, March 3, 2012

noah's ark

I've suddenly decided that my handmade felt animals will collectively be called Noah's Ark, which makes sense to me because they're being made two at a time. I just can't make one felt animal at a time. I have this really weird idea that if I just make one, that they will be lonely and sad. So, there's that.

As a side note, I have always loved the name Noah and am tucking it away for future human animals.

I started seeing felt animals everywhere online & I had some felt leftover from another project so I decided to give my hand-sewing some practice. After I made my first set of owls I started dreaming of other animals to create.


So far I've made a pair of owls (aside from these ones), lions and elephants. To give them a bit more of a purpose, I hot-glued a piece of magnetic sheeting to the back of each one. Instant adorable fridge magnets! They are only decorative though. The magnetic sheeting I had was not very strong. 
 
The owls I've mailed to a friend and I'm still waiting for her to get them, so I'll just give you a little peek. Here's the 'boy owl'.


The elephants I decided to give to my roommate B, so that he could gift them to his girlfriend C for Valentine's day. The felties spawned a whole elephant themed gift that was pretty romantic for a guy who claims he is not. They looked a little plain on their own, so to make them look more like the couple themselves, the 'boy elephant' got a pair of glasses.


 I wish the tusks were higher up, but I had to make them match after one had low tusk syndrome...


And finally, the most recent pair of animals, the lions. I realize that they kind of look like suns. You should have seen them without the faces! But I think their resemblance to the sun makes them look more cheery. I haven't magnetized these ones yet, so I may end up using them for something else.


So there's my version of Noah's ark. Next up on my list? I think I'm going to make a pack (herd?) of cats. I know someone who might like some...

I hope you're all having a fun, relaxing weekend!

Saturday, January 14, 2012

create.


Last week I bought myself a new notebook. I was using a binder with loose leaf for my sketches, craft ideas and jumbled creative thoughts but after a while I got fed up. I decided that to be productive I needed one spot where I could let out all of my ideas. I needed a notebook that would be reserved only for creativity. And I found the just the one...

My new notebook, by Leuchtturm, is perfect! The pages are not too large, have a good texture, work well with ink or pencil and are acid-free. It's a great size to throw in my purse too, so I can always have it handy.

I plan to use it for inspiration and to plan a projects, DIYs or crafts and to build my sketching skills. Here's a peek at a page which outlines the details of my mason jar candles.


The first night I got it, I could not set it down. I feel like I was holding all of these ideas cluttered up in my head. I'm actually quite surprised it took me so long to start a 'creative journal'. I use Pinterest (my page) to find inspiration as well, but this book is my spin on things. My own ideas. Just thought I would share with you.

So now I'm curious... for my crafty and creative readers, how do you keep track of your ideas? Do you have a sketchbook or idea book like me? Do you art journal? A Word document?

Friday, December 16, 2011

simple soy candles (tutorial)


A little over a month ago I made these little soy candles and only now am I finally getting around to writing about it. I had to wait until I gifted them and tested them out to make sure they were worth sharing and thankfully, they are! 

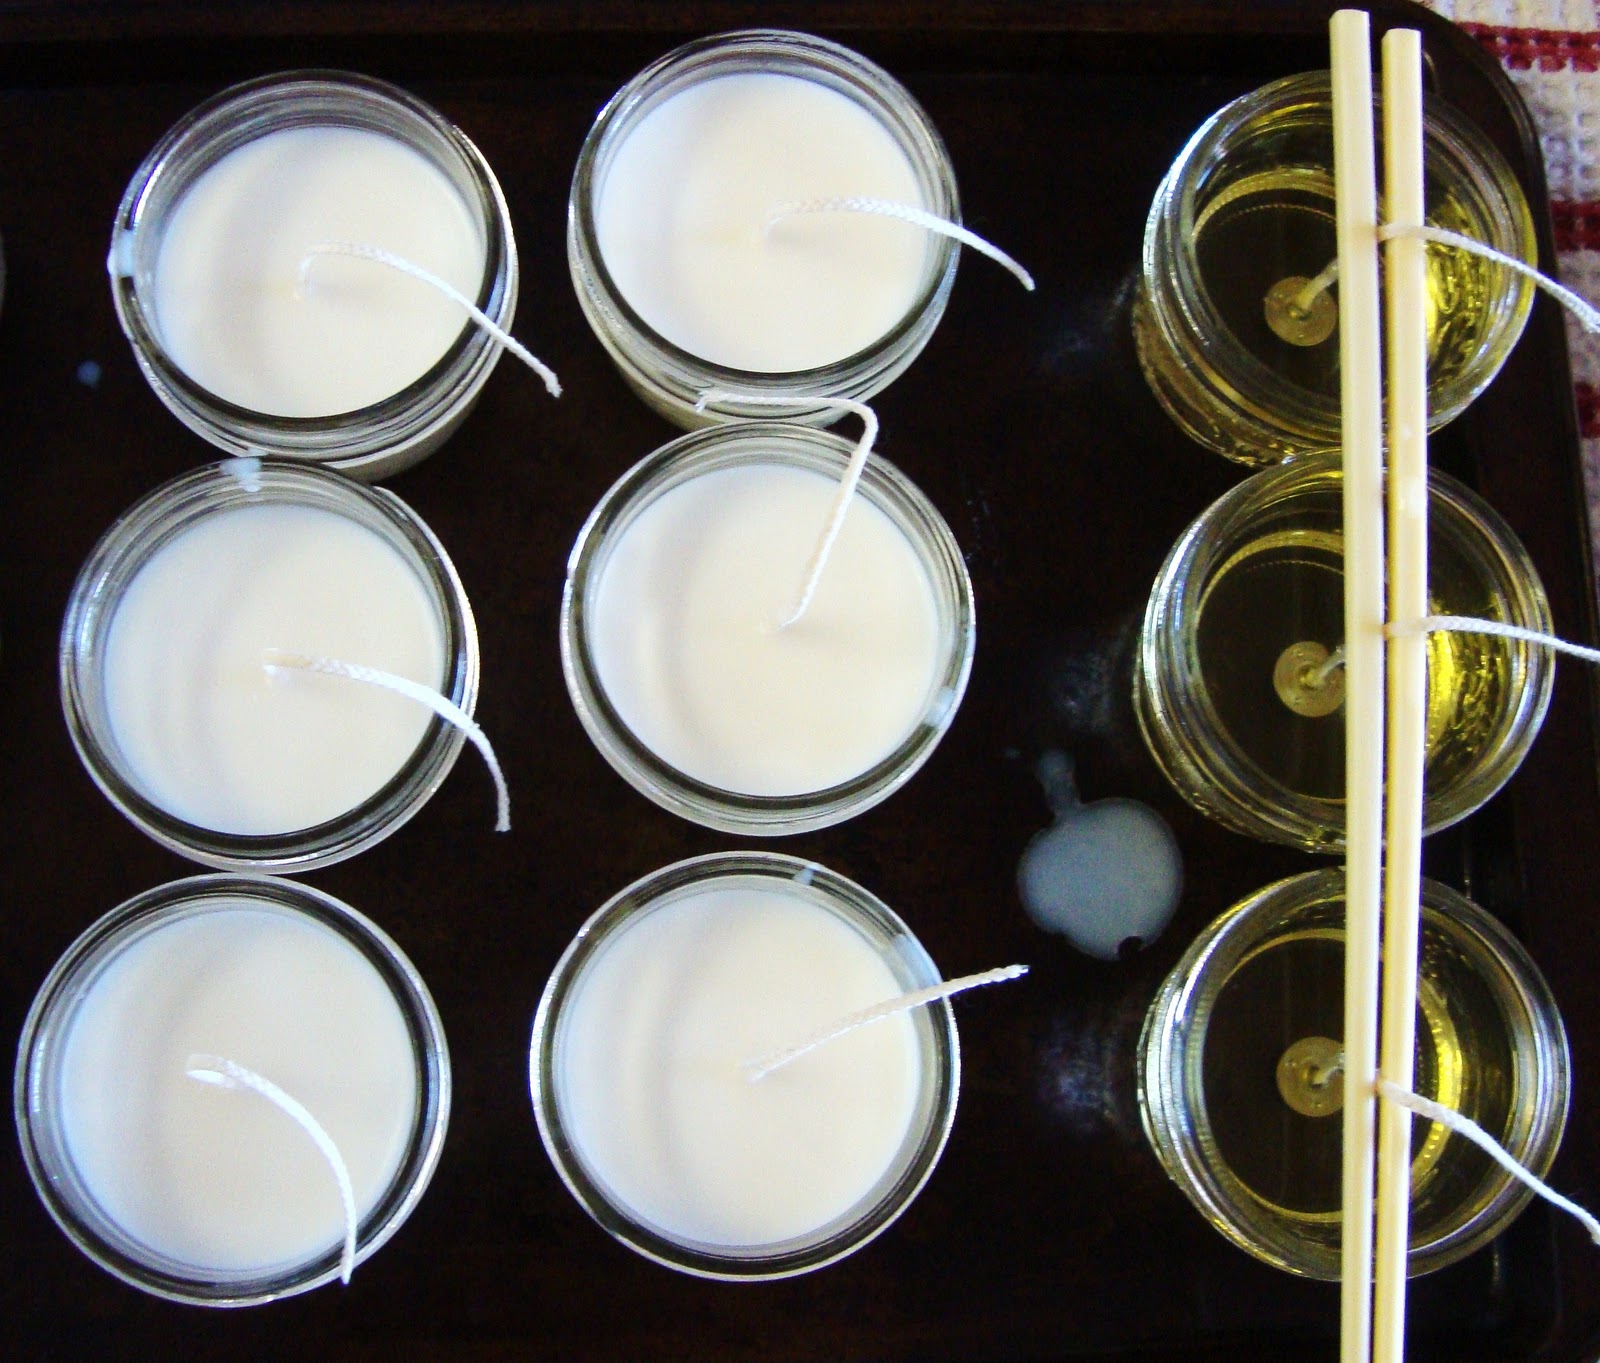
I haven't really had time or resources to make them look pretty, but I kind of like how they're unfussy & pure white. Sometimes simple is best. Plus, the scents are delicious! I made apple pie, vanilla sky & unscented. Since some people have asked how I made them, I figured I'd share the details here. There are definitely a ton of ways to make these, but this method worked for me. I used this tutorial as my main guide.

[Simple Soy Candles]

Buy or find:
- Soy wax flakes (I used Yaley brand)
- Medium soy wicking
- Medium wax clips
- Mason jars
- Candle fragrance (optional)

- Candy thermometer
- Large micro-waveable measuring cup/glass jar
- Glue gun/sticks or wick tack
- Baking sheets
- Chopsticks or clothespins
- Pliers

Do this:

Preheat oven to lowest setting. Pour some wax chips into your glass measuring cup & microwave on high for 4 minutes. If flakes remain, keep melting and stirring with a chopstick until it is all melted down like this.


The temperature of my wax needed to get to 180F so keep on microwaving and retaking the temperature! Follow the instructions on your box & don't forget to remove the thermometer before microwaving! Once the wax reaches 180 you'll need to let it cool to about 120-130F. While it's cooling, prepare your jars.


 Put them on a baking sheet (without their covers) and heat them for 5 mins or so. While they are heating up, take a piece of wicking and measure it so it hangs about 2 inches above your jar and cut. Stick one end into your wick clip, leaving the long end out where the clip sticks up and pinch with your pliers. I know that's mega-confusing, so just look.


Hot glue the bottom of your wick clip to the middle of the inside of your heated jars and arrange them on the baking tray like these ones. Use chopsticks on the tops to keep the wicks standing straight.

Work quickly. If your jars cool down too much you should reheat them. It's okay to put the wick in the oven!


If you're adding fragrance, now is the time. I put in at least 30 drops for 500ml of wax flakes. Add fragrance & stir it up gently. Now slowwwwly pour your wax (cooled to 120-130F) into the jars. Pour a little bit over the wick to help it stand up. 

Let the candles cool for a few hours and DO NOT move the baking sheet. If you do move it the wax will separate from the jar or you may get an uneven top.


Once they've cooled, trim your wicks and you're all done!


Avoid using your new candles for 24-48 hours. They'll last longer if the wax has had a chance to fully set and harden.

Photo credi : Val (one of the gift-recipients and my bestie)

When you finally do get to light them, they'll make you want to cuddle up and watch a movie. They're that cozy. And although soy wax doesn't hold smell as well as paraffin wax, they have a nice soft scent that's not overpowering.

I hope you like them... If you have any questions, feel free to let me know in the comments. 

Thank you for visiting my blog!

Thursday, November 3, 2011

painted pumpkin craft

Guess what I did tonight?

Painted a pumpkin! I've never done this before... I've always been a jack-o-lantern kind of girl. I remember seeing a picture of me helping 'carve' one with my parents when I was about 2 years old. They plopped me right inside the hollowed pumpkin for a photo. So, I guess you can say I have years of experience.... Haha.
In university I carved everything from Lion King to Gaga.

2008 (D & my first pumpkin together..... awwwwwww, yuck. cuteness.)

2009


Yhis year's pumpkin was quite a change. It's after Halloween, so it didn't really feel right to carve, so we went with a fall scene with our girl dog Abby playing in the leaves. On our walk today we were talking about how fun it would be if we could rake up some piles and let her play in them, so I guess this was inspired by that. I also didn't have red or brown paint, but I think I made it work. Abs is looking a bit gray. See for yourself:
ignore the pen marks. ugh.


I love it. It is definitely not perfect in any way, but me and D made it together. He's not really into crafts so when he seems excited & uses the word 'cute' a few times... it's awesome. He also called me a "crazy craft lady" which reminded me too much of a crazy cat lady. Clearly, we had fun. 

How was your night? Did you ever paint a pumpkin?